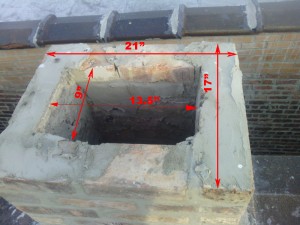
The top portion of the chimney is as pictured. It does not have a flue yet, nor it does have a crown. The mason said that whatever I choose, he will implement. I believe that I should go with a crown. What size of the crown inside should be to safely accommodate the Chimney liner?
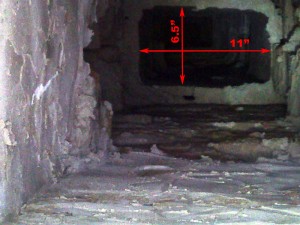
After analyzing sizing charts and, later, speaking with Josh and Dan (from Big Dan’s Chimney supply) I spoke with other contractor Nazar who happens to be a very good friend of mine and again with Josh, it looks like the best solution would be to go with two liners. Since there is a flue tile, or a floor separator flue tile support is almost 6 feet below the top of the chimney, I had to make both liners fit thru it. Its sizes are 11 x 6 3/4. It looks like the best way to go is to have both liners be 5 inch. Since the outer diameter is about half inch wider, plus the T-connectors add their own thickness that goes on top of liner outer diameter, bringing us just below 5.5 inch diameter. So I am keeping my fingers crossed that I will be able to squeeze thru this 11 inch opening. It seems large at first glance but 5.5 + 5.5 is right there!
So the bottom line is that I need to place an order to include everything I need. That would be two 5 inch chimney liners: one is 40 feet and second one 20 feet long. The first one (40′) will go all the way to the basement and will be connected to the pipe that exhausts 3 water heaters 40,000 BTU each (120,000 BTU combined).
Second liner (20′) will be connected to a second and third floors furnaces that are again 40,000 BTU each. So even if we were to increase the furnaces at some point of the time, we still would be in a good shape according to the chimney liner sizing charts.
I will need two bottom T connectors to connect the pipes and one middle T connector to connect the third floor furnace, which will be in the middle of the 20 feet liner. Also I will need to have a double chimney cap that would cover both liners from direct exposure to water and snow penetration as well as birds falling in and clogging precious liner opening.
Another piece of puzzle is what the liners have to be secured to at the top. In case of a single liner, there is no puzzle – they are collared by a cap. I have two liners coming out of the chimney and they will be sitting pretty close to each other. Now it has to be either two top clamps to hold both liners at the top that would reside on top of a sheet of metal with two holes or, I believe, the chimney liner industry has always something up its sleeve.
The most surprising part of this entire saga is how supportive and understanding the people i-never-met are half country away. They took their time to listen to my project details, study my drafts and take each piece of information into consideration. Brought real professional consultants into the picture, which informed me and encouraged helping me with right decisions, not only trying to sell me something but really caring about the outcome.
Update: I was recommended to order a 17 x 20 cement crown mounted cap. It would also have screws on top to be able to remove the protective sheet of metal and clean the liner. Hence I would need to figure out the size of the cap itself. It should definitely have a drip edge not to have water run down the brick, but rather fall off it.
Looking forward to hearing the answer to what specifically needs to be ordered.
Update (3/2013): On the chimney on the picture above I have installed the “17 Inch x 21 inch with 12 Inch Tall Standard 3/4 Screen Stainless Steel Gelco Chimney Protector Top Mount Chimney Cap for One or Multi-Flues” that ordered from www.fireplacemall.com. They were among the most affordable ones and had it in stock. I have ordered 12 inch in height, since I am planning for two flues sticking out. It is a rule of thumb to have the flues of different height to prevent a downdraft from one flue into another and you have to have 5 inch clearance above the tallest one (according to code). So, say I have 3 inches one flue, have 7 inches another flue and need to have 5 inches clearance above it. There you go – we are at 12 inches already. Hope I make sense. At the moment it looks like this:
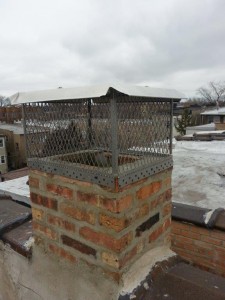
However at the moment on the chimney that should have t liners I did not put liners. (Confused yet?) I am yet to order them. Also there is a concrete crown that is supposed to get poured by my mason. Concrete poured in winter, below freezing… outside… not a good idea, right? So, since the crown will add another 3-4 inches, I would like to have it complete before I put down a liner and cut it off at the exact length it is supposed to be cut off, then mount this cap and secure with flues to have a project look neat and prevent moisture get in from outside.
Pay attention on the picture to how secured the cap to the chimney. One of the piano hinges is sitting on top of the brick and the rest are secured to the sides. When you secure it to the sides, the screws are harder to get out from deterioration (the water would flow out of the hole and not stay unlike in the holes on the horizontal surface) and the one on the top would prevent from the cap to just drop down and block the opening of the chimney. You never want anything to block your flue – gases would go back inside, it would be bad. So used this trick, although nothing should happen since there are 8 masonry screws are holding it in place.
Now, this solution on the picture prevents rain (without wind) from getting into the chimney opening, but does not prevent windy rain as well as all the products of combustion containing lots of water vapor from condensing on the inside on the brick. Once warmer temperatures strike, and I can continue my work, I will post more updates.
To be continued…
Did you finish this project? How did it turn out? There may be other options if you were unable to complete this as planned.
I have just updated the post with more info. Basically waiting for warmer temperatures to pour the chimney crown first. But prevented the water from getting inside, read on the site how.